


Traditions St.Louis Hawken Build
3 posters
WELCOME to High Plains Muzzle Loading Forum! :: Muzzleloading, Firearms & Optics :: Custom Gunsmithing & Builds
Page 1 of 1
![]()
 Traditions St.Louis Hawken Build
![]() by Buckskins&BlackPowder 28/11/21, 10:30 am
by Buckskins&BlackPowder 28/11/21, 10:30 am
Jan/2016
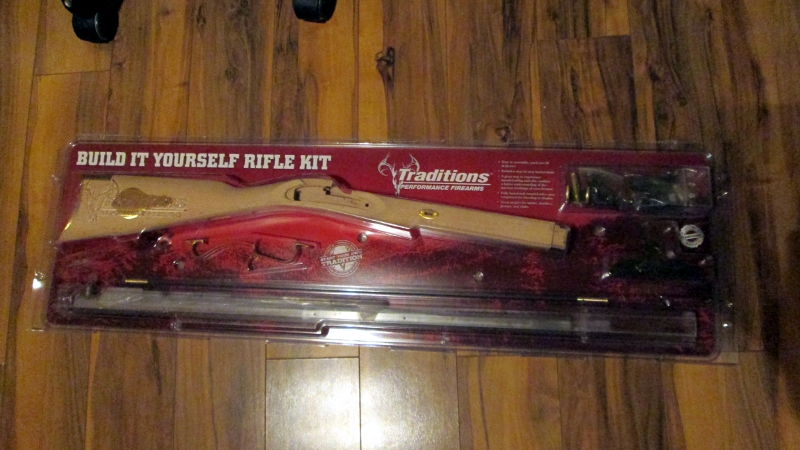
Traditions St.Louis Hawken .50cal Percussion Kit Build Along
Well, After a week solid of thinking, It was time to purchase a new side hammer to replace my "old" one that was getting a little to heavy for me in the mountains.
I decided to go and get the St.Louis Hawken .50cal kit. Why .50cal? I am lucky to hunt Colorado big game every 2 -3 years depending on what I am putting in for. Our draw system really stinks, but what can you do? Besides going hog hunting in Oklahoma with a good buddy!
Also, Due to the fact I don't get to hunt every year for deer or elk, the .50cal round ball is perfect for target shooting. Super easy recoil, cheap to cast or even to buy, and basically, if I ever need to use a conical, a .50cal is the way to go due to the market being FULL of .50cal projectiles.
After a long search, I ended up at Muzzle-loaders and after some more time of looking around online for the best prices, they won and I put in a call and it was out on the truck that evening! Also got online and ordered a Birchwood Casey stock finish kit, along with cleaning patches I know I will need, and a bottle of their Rusty Walnut stain. I plan on using their Walnut and Rusty walnut stains to help pop the figure and add a nice fire like glow. That is of course unless I change my mind as I normally do!
This article is going to be a huge helper to anyone building this model and I plan to cover everything from the basics, upgrading and of course, problem areas that I encounter to help the next Builder should he or she run into an issue while they build their own St.Louis Hawken kit!
This kit ran $318 + $8 shipping. Some places wanted MORE for a kit, than Muzzle-Loaders wanted for the factory built rifles!
Why a kit? Simply because I can control the quality of the finished product, but add my own personal touches such as stain, stock finish, barrel finish and of course, the modifications I will be doing!
If you want to look into a new gun or a kit gun, check out www.Muzzle-Loaders.com they have the best prices by far on the Traditions guns.
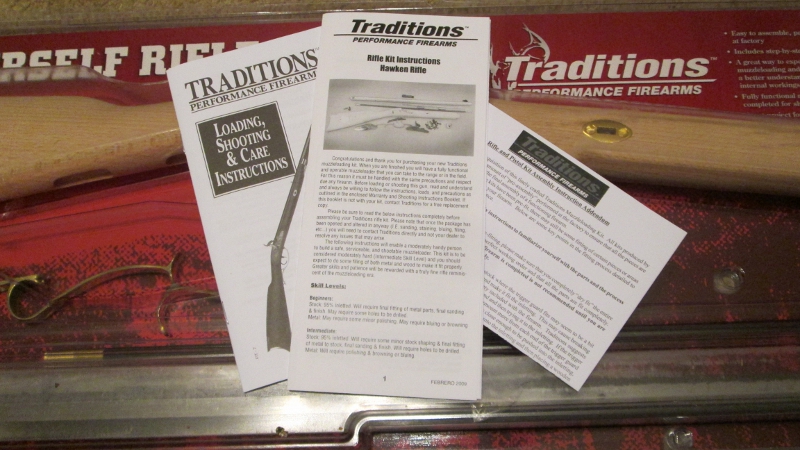
The rifle kit comes with the users manual as well as a couple manuals to help you along with the build, offering tips and tricks for properly fitting parts to the wood and what to look for along the way if you are having issues. Very helpful booklets!
The rifle kit comes with the users manual as well as a couple manuals to help you along with the build, offering tips and tricks for properly fitting parts to the wood and what to look for along the way if you are having issues. Very helpful booklets!
Using a pencil, I traced around the lock plate and used a spade shovel like wood scraper and 100 grit sand paper to gently open up the inletting. You don't want your inletting super tight, because once you stain and then start applying oil, it will build up and make for an even tighter fit.
Look for obvious rub marks such as these! Remove wood if needed. Once I had the inletting open enough for the lock to fit nicely. I used a small plastic mallet and tapped the lock into the inletting even more to make sure all fit well. These rub marks caused no issues and was just the bridle rubbing. You can open these areas up if you want, but if it doesn't cause any binding issues, all will be fine.
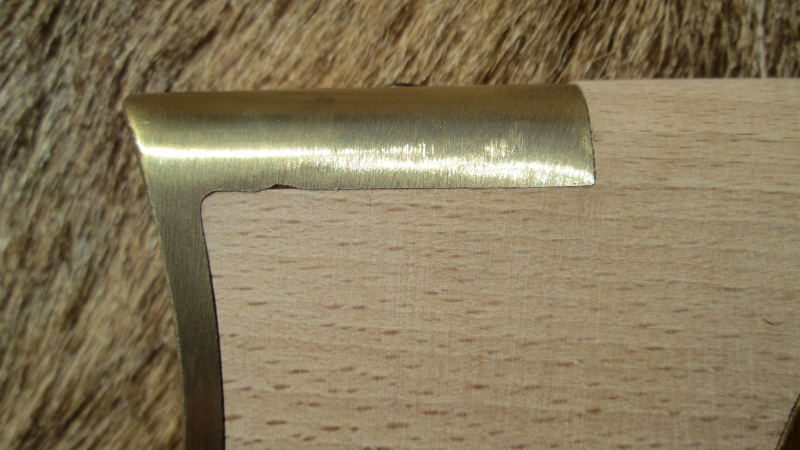
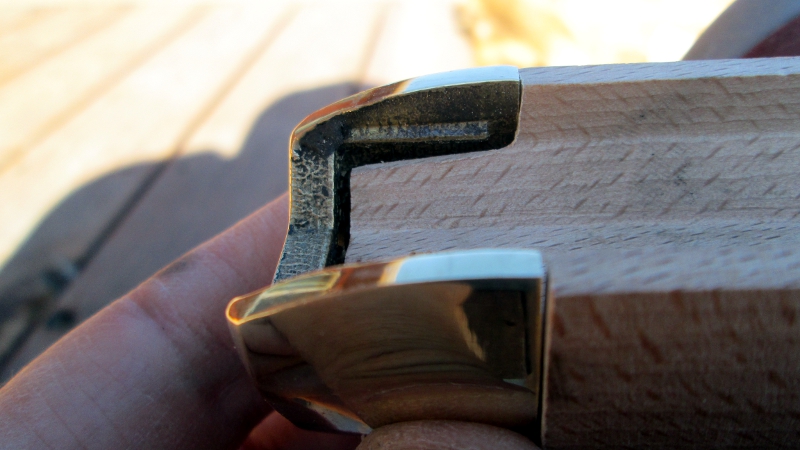
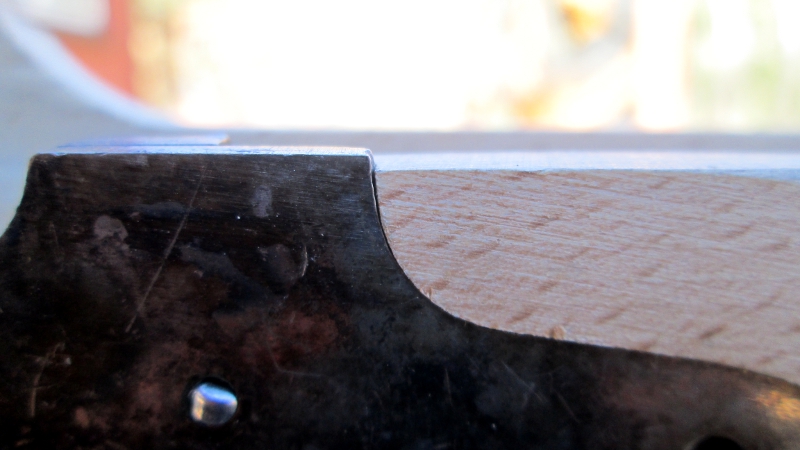
Below we can see a little "slag" that will need to be cleaned up for a nice metal to wood fit. The butt plate will also need a slight polishing before being antiqued. I really honestly do dislike brass. Metal is much nicer when browned.
A little extra wood in this area below is great as it allows YOU to fit the butt plate perfectly to the wood and get the shape just right.
Before removing any wood from the Tang area, Always check and decide if it will need a little bedding for a perfect rock solid fit. In my case, I will bed the tang & trigger plate as these are issue areas that can cause the tang screw to loosen up over longer shooting sessions.
Lets think about it for a minute... Wood.... Steel.... High recoil... Movement.... When you start shooting heavier loads such as conicals, any movement in this area WILL cause the metal to eat into the wood and change the balance of how well the wood to metal fit is. I always bed these areas to make them super strong and handle any extra recoil it may see one day.
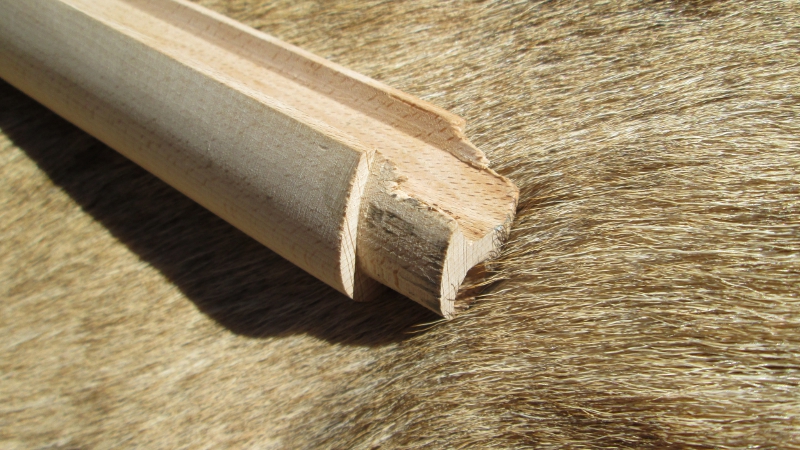
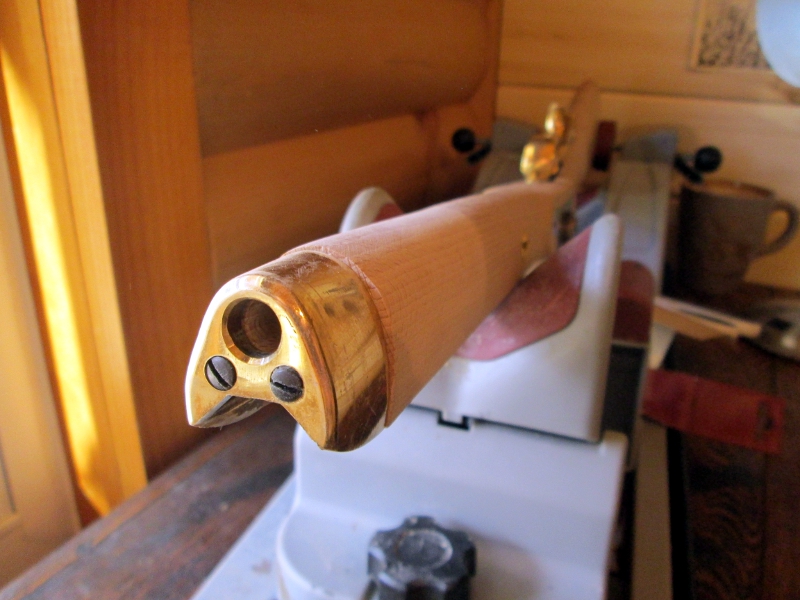
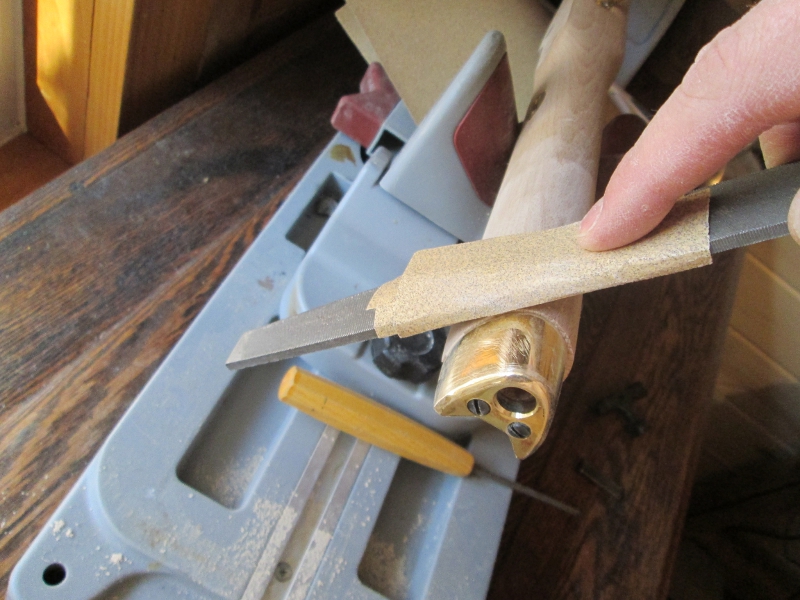
The nose cap needs quite a bit of wood removed, but luckily, this is a very easy area to work on as its just straight and round at the bottom. Remove the wood with a file and sand paper until the nose cap is a nice easy slip fit. Drill holes and wax screws before installing! Brass screws can snap off if not waxed! Once the nose cap has been screwed into place you can use masking tape on the brass and then go about shaping the wood around the nose cap.

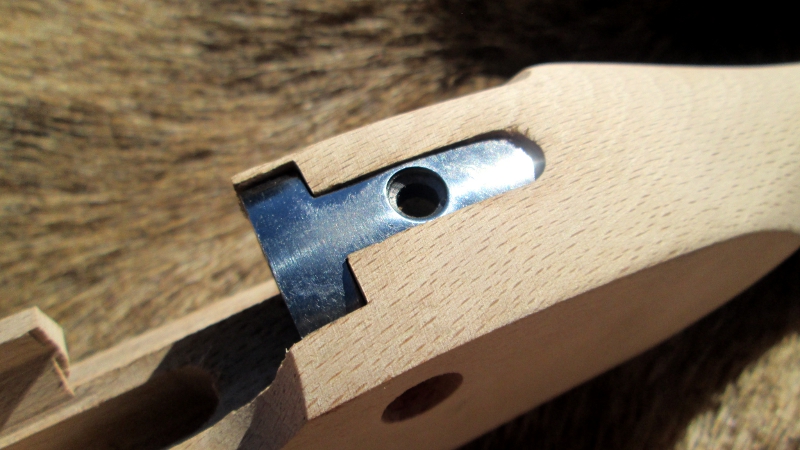
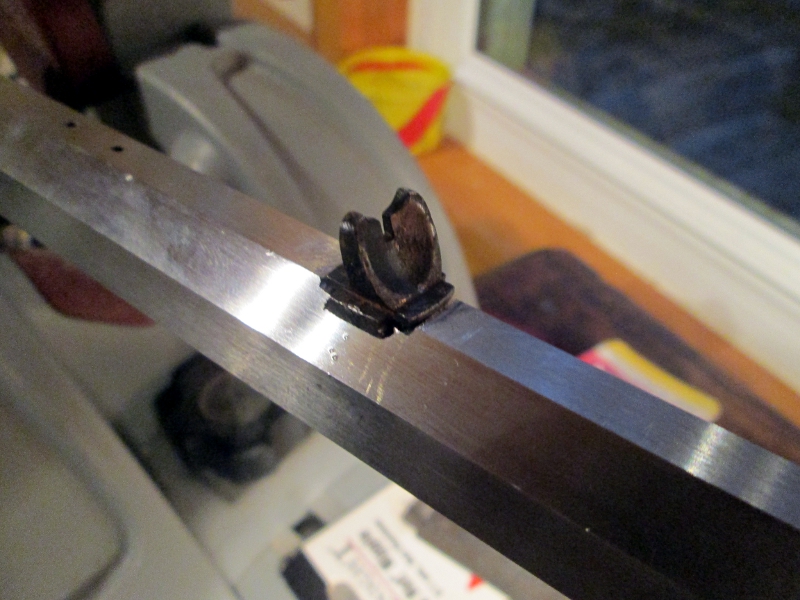
Inspect all metal to metal contact parts for burrs such as this burr below. A metal file will easily remove it and make for a better fit into the tang.
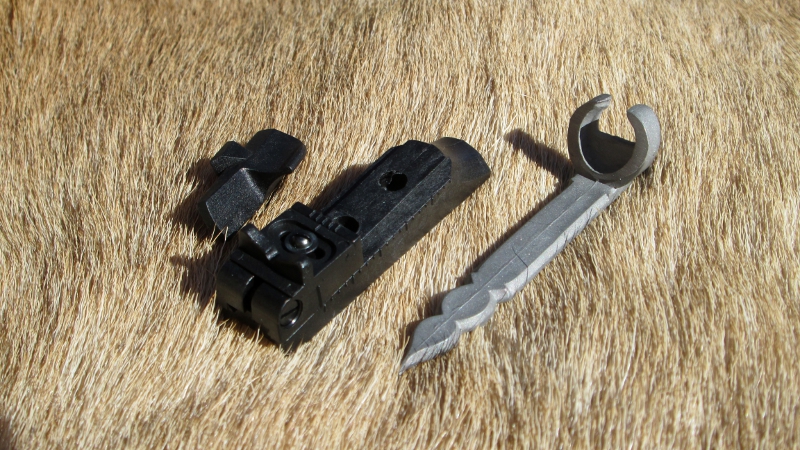
Two screw holes! Yes, sadly, this kit comes with plastic sights that screw into place. In my opinion it costs more to drill and tap these holes than to just machine a dovetail like they did on the front sight!
Factory plastic sights VS a Hawken drill and screw on sight available from the Hawken Shop. I have not made up my mind as to using this sight or just cut the dovetail in the barrel flat and install better sights. I honestly feel that cutting the dovetail is the best way to go.
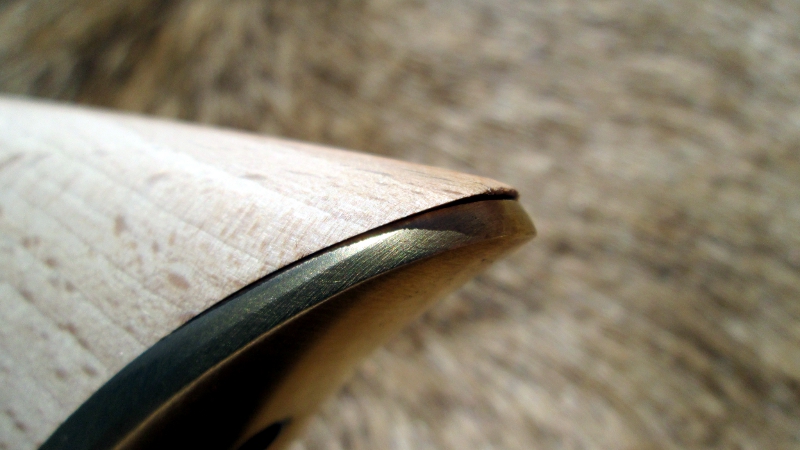
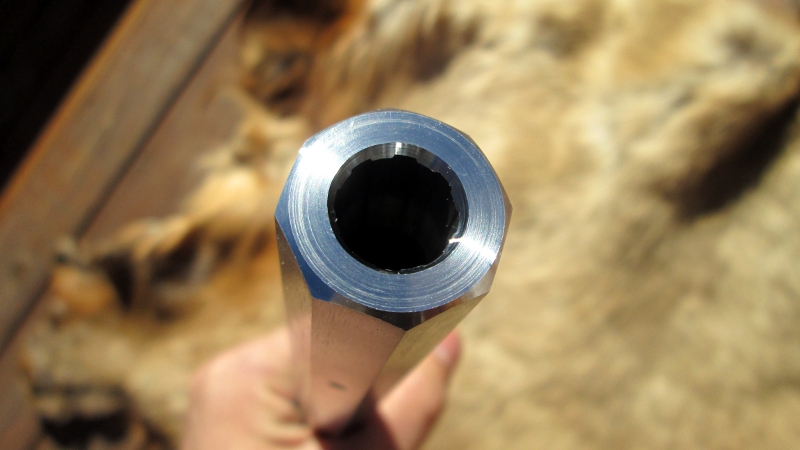
One of the first things I looked at when I opened the box was the barrel! Always inspect the crown for major nicks/burrs. A burr can cause poor accuracy and cut patches. This crown was perfect and shines like a chrome finish.
The trigger guard WILL need inletting extended in order to properly fit. In the building manual is clearly states " DO NOT BEND TRIGGER GUARD TO MAKE IT FIT!" Breakage of the trigger guard is NOT covered under warranty.
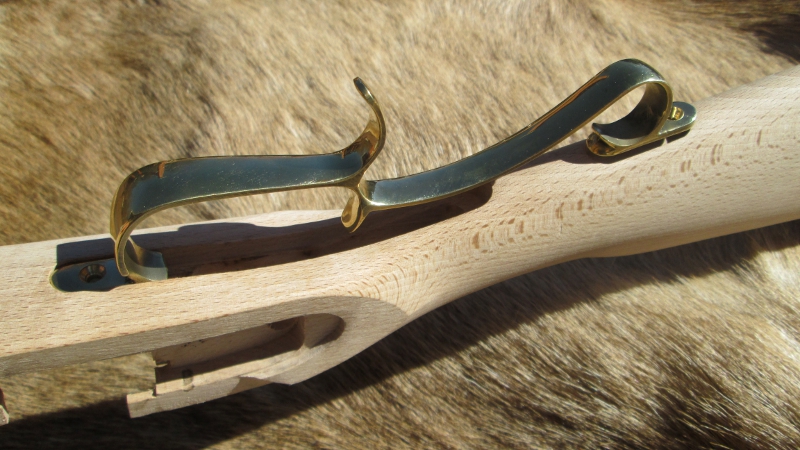
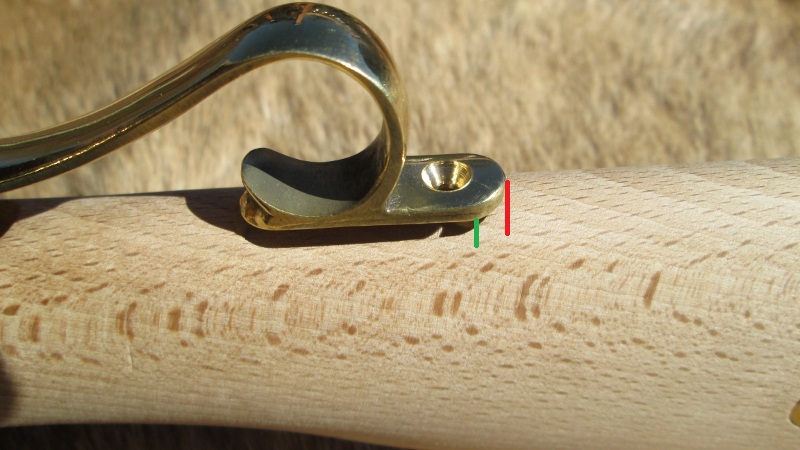
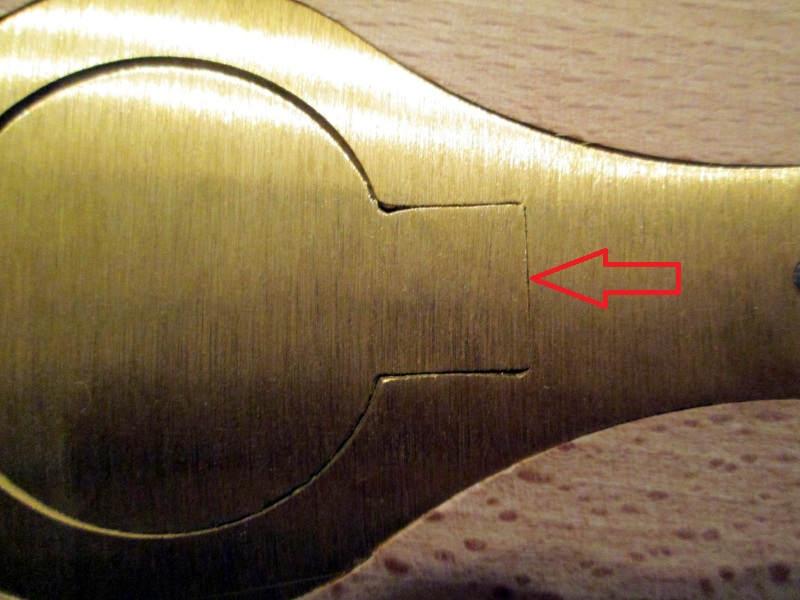
Start of inletting - Stop of Inletting needed : You can also just file the brass to fit the current inletting, rather than inletting the wood.
The wood actually has some real nice pattern in it and I will be able to make areas like this, pop out very nicely once I start applying a finish.

Inletting shows some run off from the milling machine. The barrel seems to fit perfectly, but I will smoke the barrel and lay it in the channel to find if this is causing any uneven seating issues.
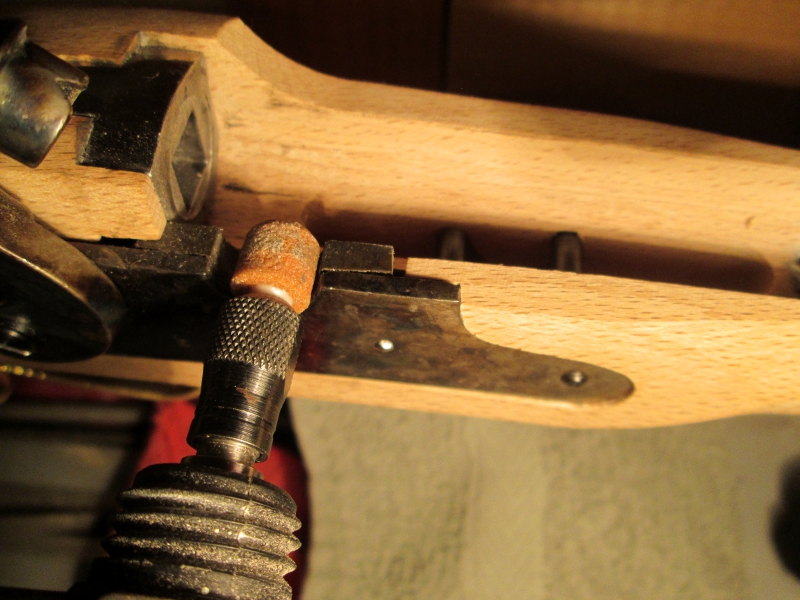
Now to start inletting the trigger guard, I actually went and inletted it a little more than usual due to the angle the trigger guard goes in, it needs some extra room otherwise it WILL scrape the finish off the first time you remove it to drop out the trigger for cleaning. First I installed the front section and screwed it down. Next I lined the rear section up with the inletting and traced around it using a pencil.
This looks a little off and it is. Once you start, you can always remove a little more. Its better to remove less than take out to much all at once.
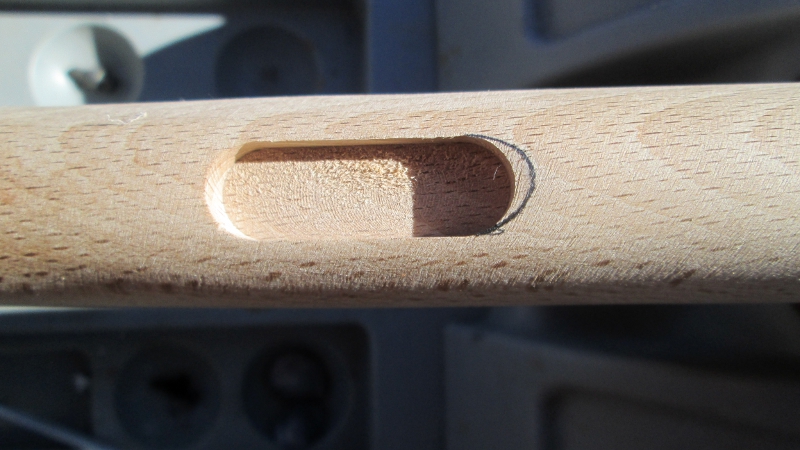
Using my wood scraper, I lightly tapped on the back end of the scraper and traced the pencil line and very carefully, started to remove pieces of wood.
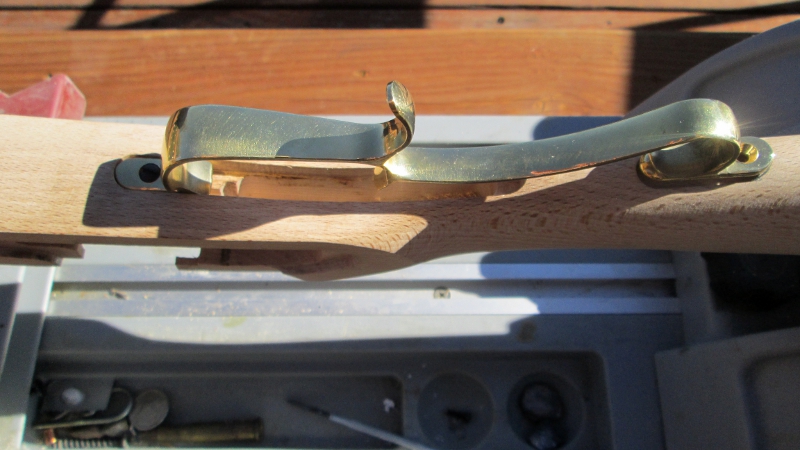
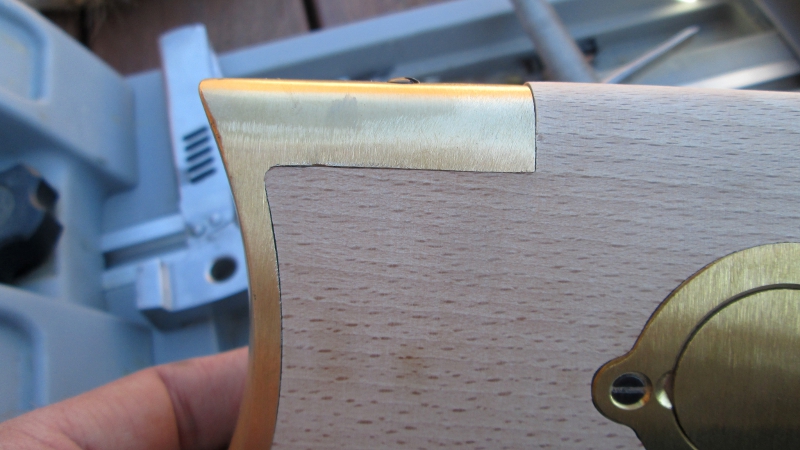
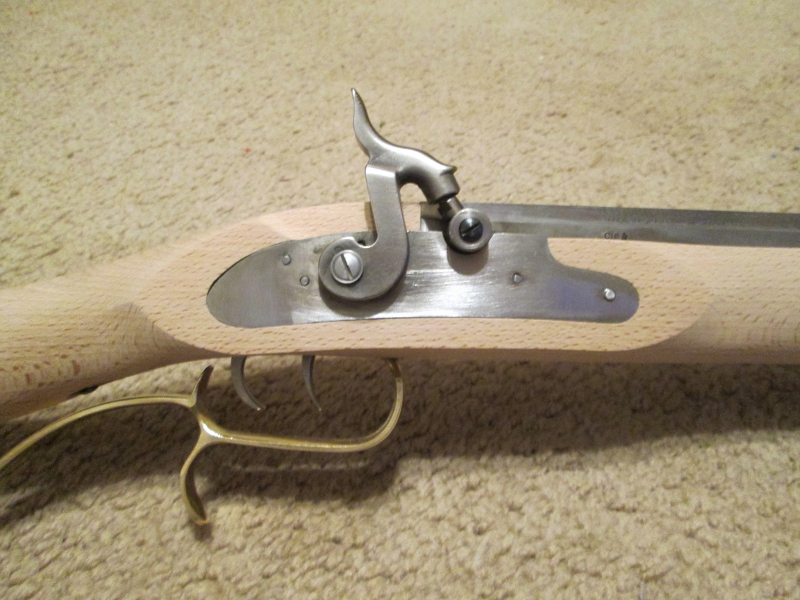
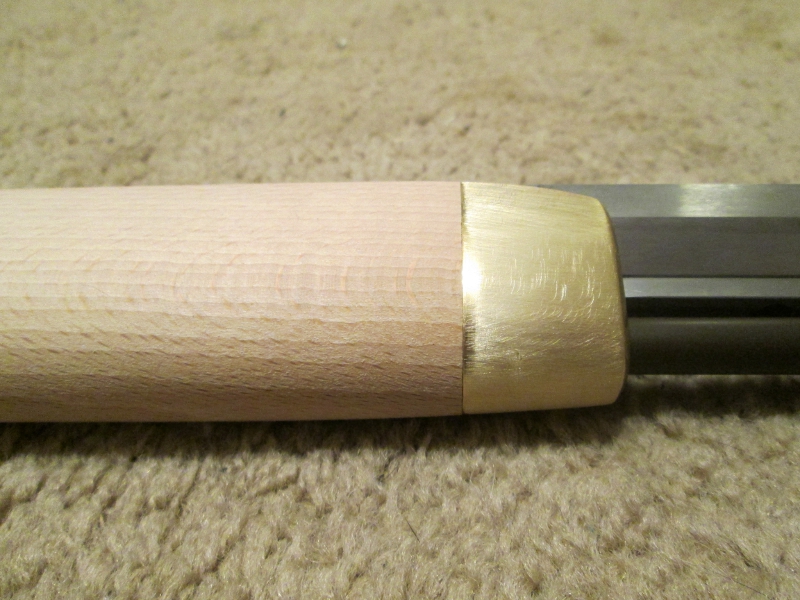
Fitting the nose piece was no big deal. File off a little more wood than needed so you can perfectly adjust the nose cap with the top of the wood. * Note * Install percussion/Flicklock and see if the metal of the lock sits evenly or above wood line. If the lock sits above the wood line, install the nose cap perfectly flush with the wood. You'll see what I mean a couple pictures down.

Originally the wood was flush with that brass bumper you can see above the wood/empty space. This position actually put the brass ABOVE the wood line, therefore, I removed extra wood so I could center the nose cap perfectly level with the wood.
Now this is what I am talking about above a couple pictures! Notice how the lock metal sits ABOVE the wood line? Normally this should sit flush but lets face it, its a $318 kit gun and not everything will be perfect. You could file or grind this part of the lock down for a flush metal to wood fit, or you can do like me and say to hell with it, It's not a multi-thousand dollar rifle, the deer won't notice! It doesn't hurt the function of the the rifle in any way.
The top section of the butt plate had a burr under it * Note the first pictures in this thread * I simply used my file and knocked it down and rechecked fit. All was good! I still have to file the metal to the wood, but that comes later as its very easy to do.
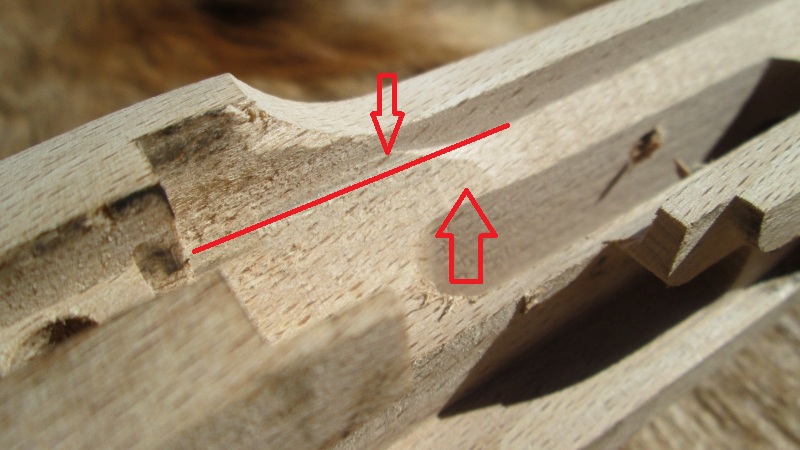
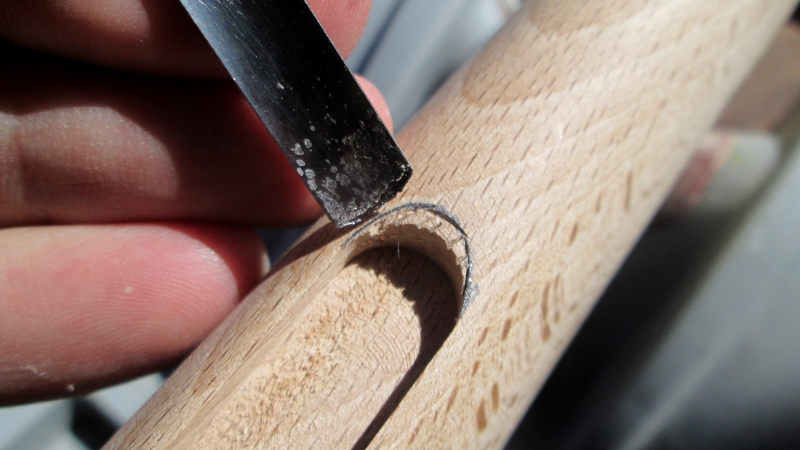
Now also getting back to some earlier shout outs about the barrel channel inletting, I used a few matches and blackened the bottom and sides of the barrel and gently laid the barrel into place, squeezed the barrel into place and with a plastic mallet, gave it a couple knocks to leave an imprint. This unfinished section of barrel inletting was fixed by using a straight scraper and now the barrel sits level. Black line shows how much I had to remove for a nice barrel to wood fit.
Now, I know I am building the kit version, but the pictures below were a lot better quality and I can show you up close and personal where you can improve the overall strength of your Hawken.
First, lets assume your rifle is a kit gun, if not, a little masking tape over the top of the stock and then cut out with a razor will help protect the factory finish from the bedding agent.
Now it doesn't matter if its factory or kit, THIS is a highly important area that MUST be bedded for increased strength and accuracy. The Trigger "Plate", After years of shooting factory made and kit version, Hawken rifles, I found that after a good solid day of shooting, my, accuracy would just dump off the chart and leave me swabbing the barrel, changing patch lubes, try different seating pressure, only to go home, strip the gun and find the TANG SCREW loose!

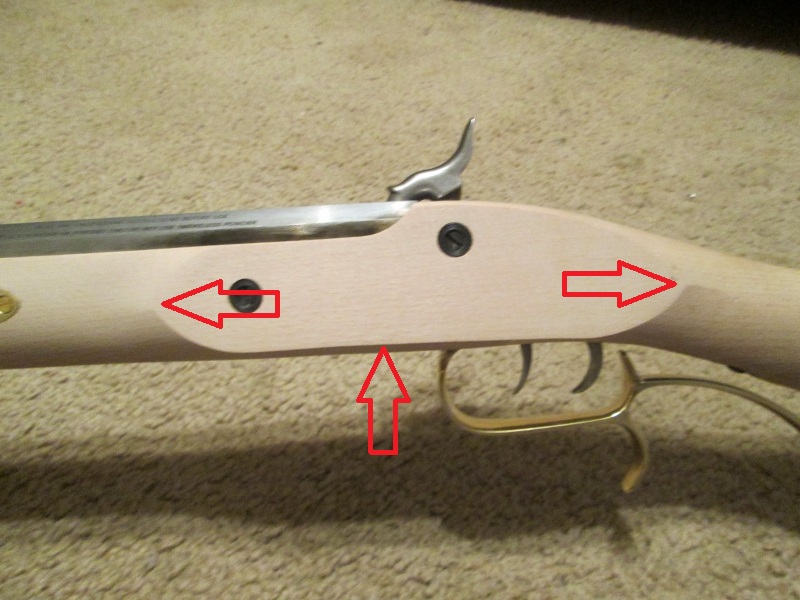
Bedding is applied into the RED areas in the pictures below:
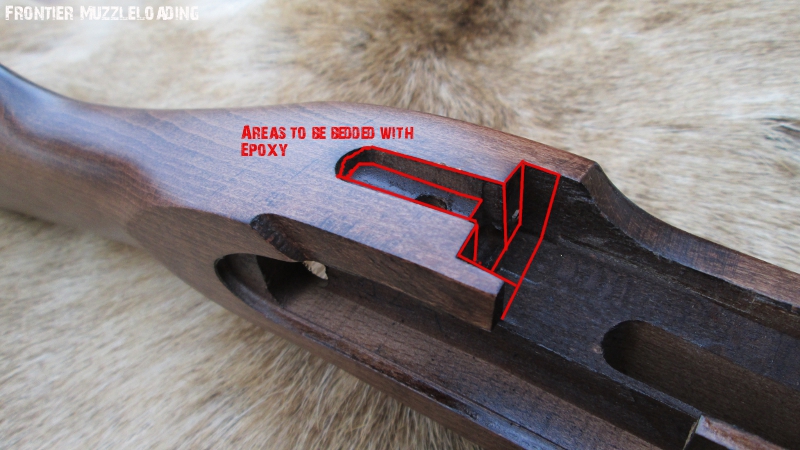
What happens, is the wood is obviously soft and metal, hard. When the tang screw gets a little bit loose and you are shooting the rifle without a care in the world, that metal starts to rock under recoil, eating into the wood a little at a time. Probably so little, the naked eye won't notice. Once that screw gets loose, ahhhh! No big deal, tighten it up a little and we're back in action!
And so you are, until it happens again.... And again..... And again.... till the point you are now a 1/4 - 1/2 turn past where you started when the rifle was new. Those metal parts are slowly being pulled into the wood, causing you to keep retightening the tang screw and then you have a trigger failure!
A real scary situation is when the wood wears down so much and you tighten the tang screw so many times, you actually start pulling the trigger assembly INTO the lock sear, causing it to trip the hammer as you pull it back into Go Huntin! Position.
I had this happen to me on an old gun I had years ago and fixed it by putting a little wood puddy under the front of the trigger plate to reposition it into its original inlet position. This area is not only important for better accuracy, but for a safety factor.
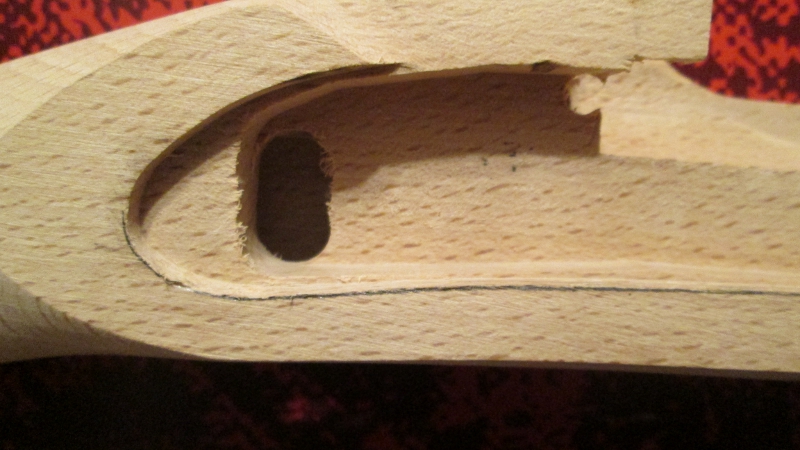
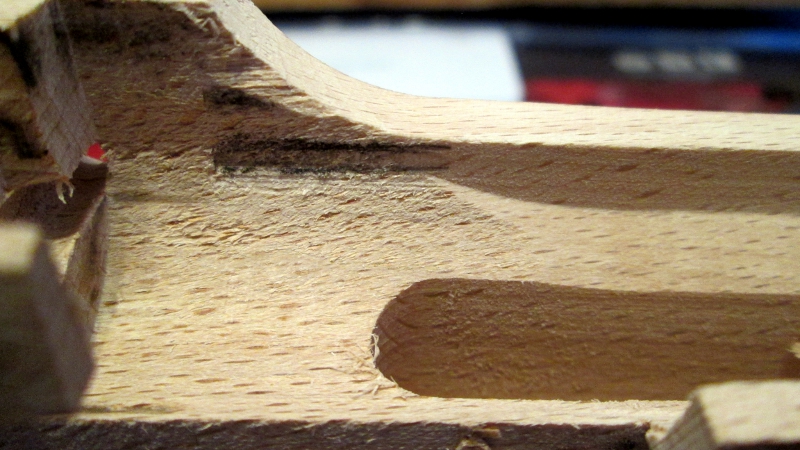
Note the left side of the trigger inletting. Notice that huge cut out section? You can plug the tang screw hole with a 30-06 projectile or something that fits nicely ( Make sure to lube it with a release agent) and fill that entire section in around it. Once it dries, you can use either a scraper to inlet it, or a dremel with a thin stone grinder.

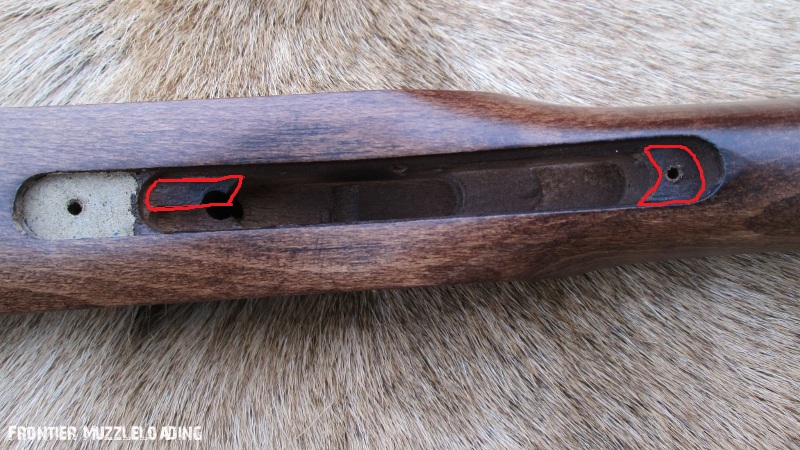
This cut out is actually for the trigger spring. Its oversized BIG TIME and this is an issue when you are shooting it in non bedded fashion. The trigger rocks to the side as you tighten the tang screw and is pulled into the wood.
I've even seen some signs of the wood compressing badly in this area, and that can lead to a safety issue of the trigger group being pulling into the lock sear, causing the hammer to unexpectedly to fall on to a live percussion cap, causing the rifle to fire.
Once again, kit or factory, install the tang into the stock without the screw and make a mental note of where the gaps are between the tang. You will need to bed these areas if you want to make the tang/trigger plate rock solid.
The fore-stock, is another area that you may want to check out. But first, lay your barrel into the barrel channel, seat it, and see if it rocks or has any side to side movement. If it does have movement, I like to bed the barrel channel 1" Behind the wedge key, and 1" behind the nose cap. Do NOT bed the area where the barrel and tang meet up! You must leave space there in order to properly remove the barrel from the tang/stock.
There are plenty of epoxy/bedding products available today. I like to use JB Weld ( Original 6-12 hour set up ) when the rifle I am working on has tight inletting. If you have parts that fit loose and will have obvious voids, use a product that will accept a stain or comes with a mixable stain. A great Release Agent to use is Johnson Flood Paste wax.
Once you have these areas bedded, you have will one hell off an accurate muzzleloader, along with a safer trigger assembly that will not self destruct under heavy use!
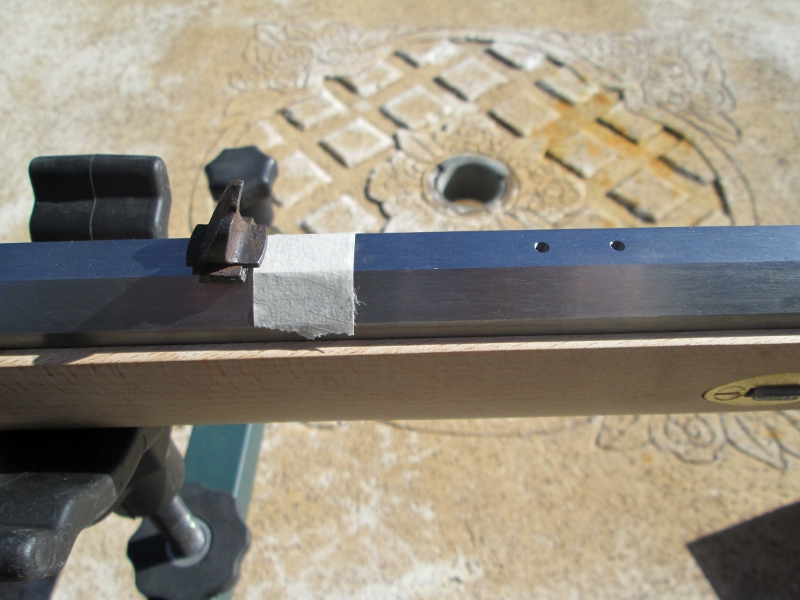
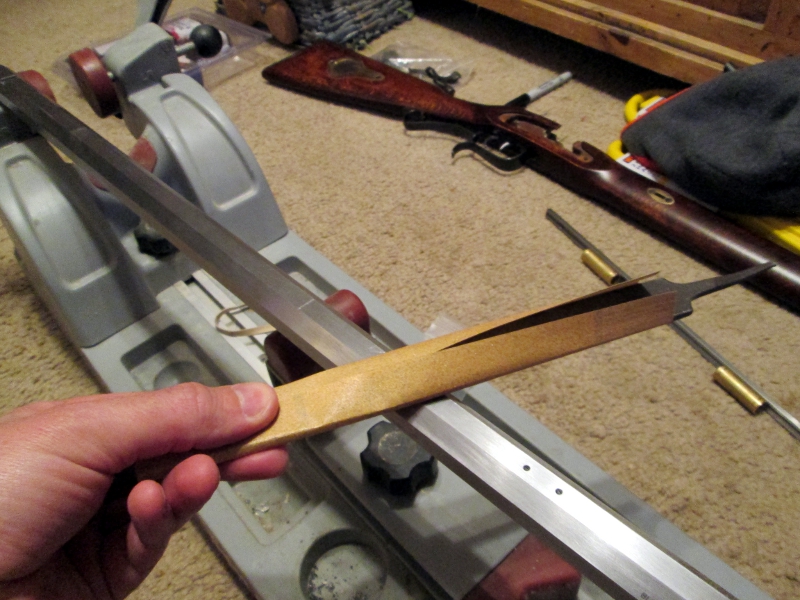
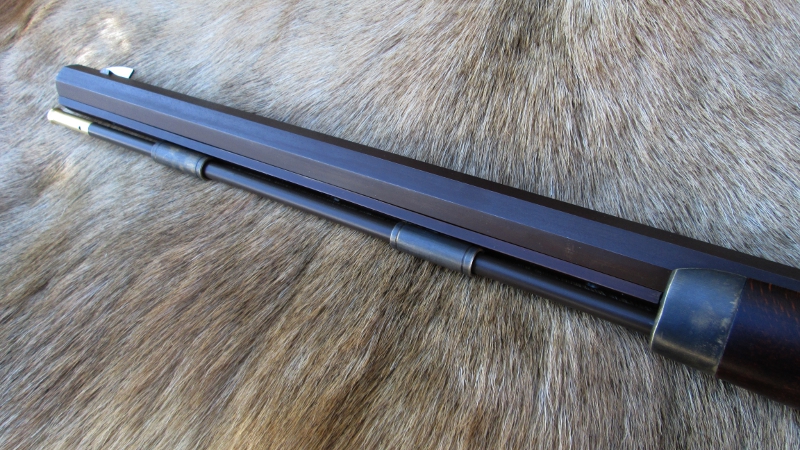
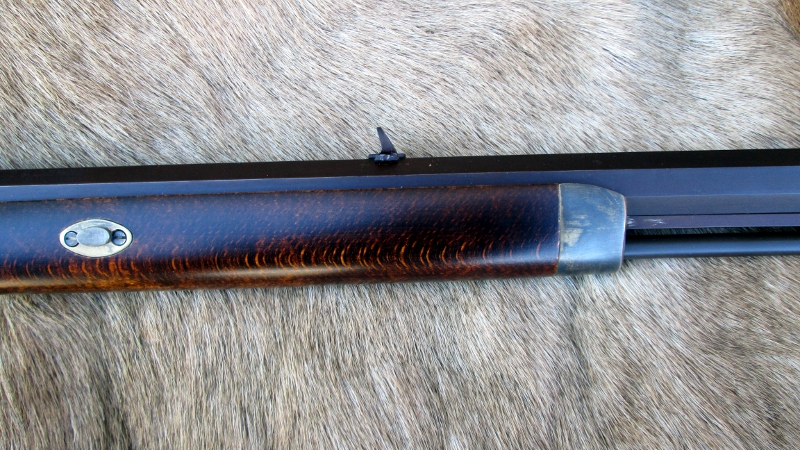
Taking the rifle out to 100 yards, I got it settled in a rest to keep the steady, along with masking tape to make sight shaded and to mark where I wanted the rear sight to be. Starting at the factory mounting holes, the rear sight seemed blurry. I simply slid it forward until it was PERFECTLY clear for my eye sight! I am super happy and excited to get this rifle out to the range now that I have a sight set up its crisp and clear.
Left side is the Muzzle End. Notice how much further up the sight will sit? This distance is perfectly clear for my eyes. A good 3 1/2" further up the barrel than the factory mounting sight holes.
Now I suggest you either practice on a junk barrel or just pay the gunsmith to cut the dovetail ( should you choose to replace the factory sight) because if you go to deep, you can have an unsafe barrel, put it on crooked, you're still up the creek. If you are unsure of how its done or simply do not have the faith in your ability, leave it alone and seek professional help!
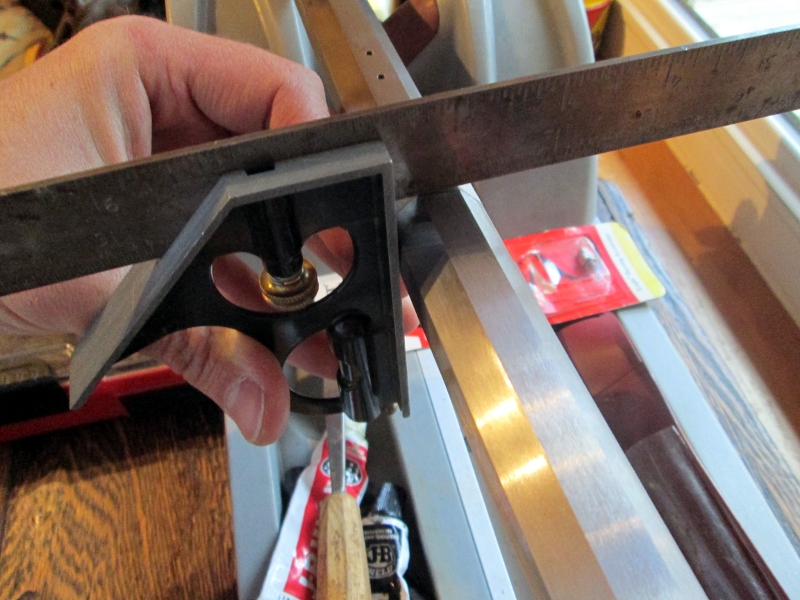
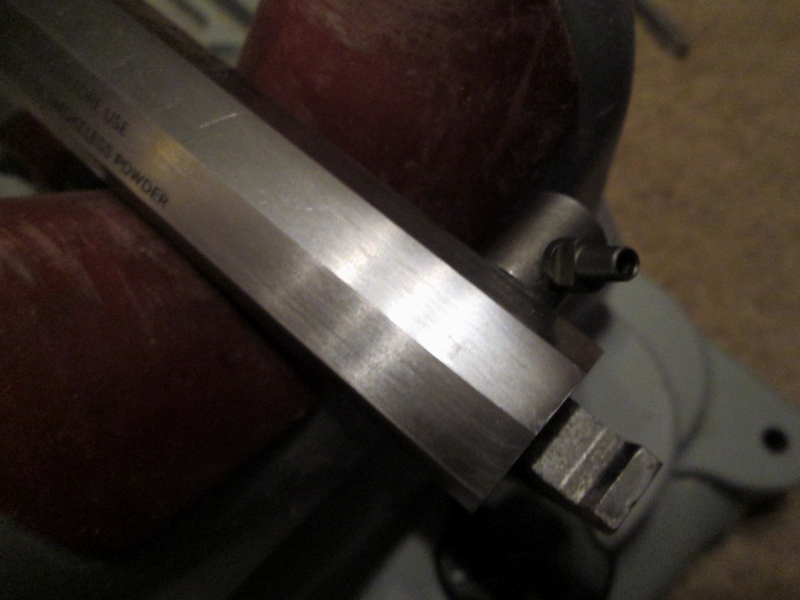
Using masking tape, I marked the area I wanted my rear sight to be, then I squared it up and drew a line on the barrel with a pencil. Using a triangle file, I lightly cut a mark across the line so the hack saw blade would have an easier time cutting in STRAIGHT.
When cutting a dovetail, cut the lines together as close as possible as it will make it a whole lot easier to remove the metal with a variety of triangle and flat, square files. This was left a little to chunky and I spent more time removing it.
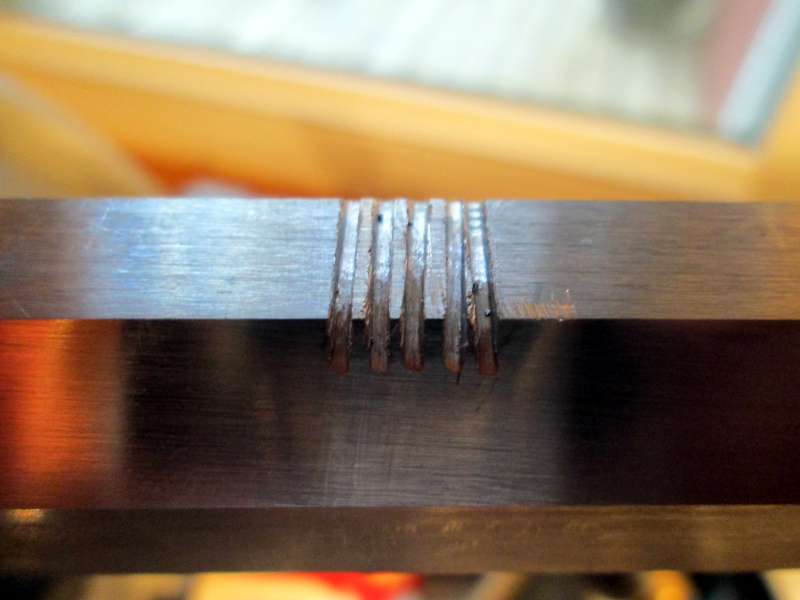
Filed out cleanly and flat, next I turn the hack saw sideways and cut the groove for the dovetail to slide into. Follow up with a triangle file for final fitting of the rear sight into the dovetail.

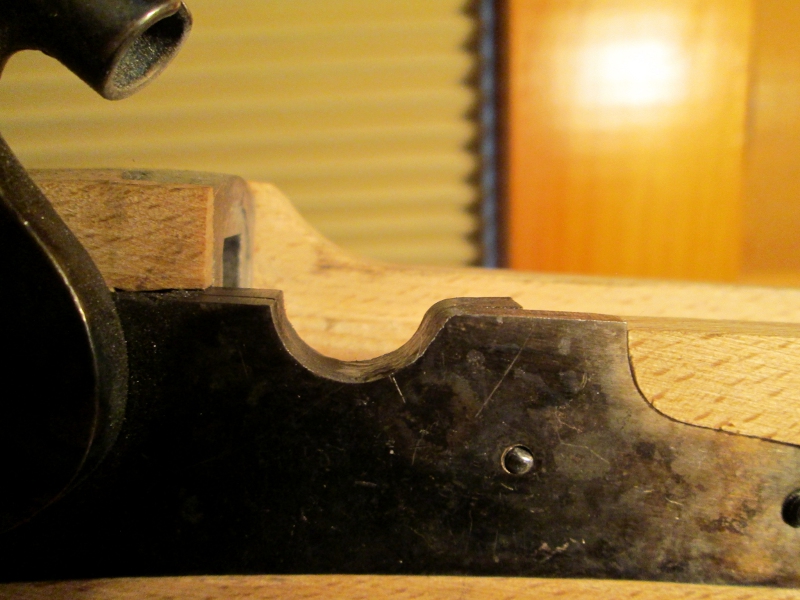
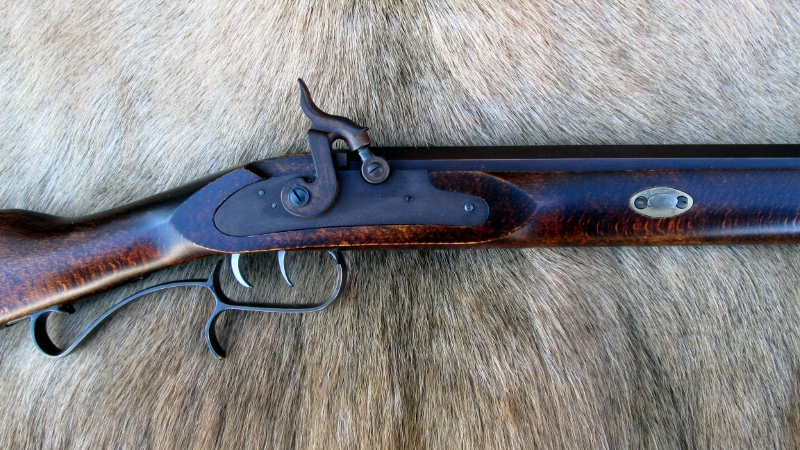
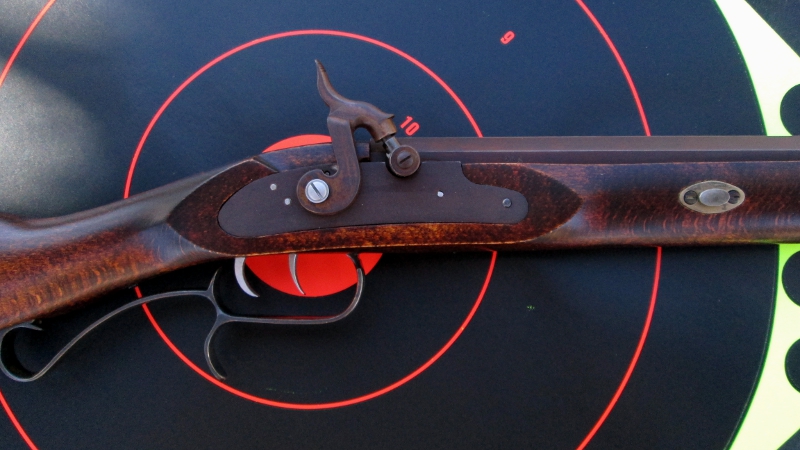
Next I moved onto the lock as I noticed that when I'd drop in the barrel, I had to wiggle and get it just right to drop down into place. The drum was lightly rubbing against the lock cut out. This is common on muzzleloaders with the drum set up. The basic issue with this is, it scratches the finish off the drum and giving you a harder time dropping the barrel down into place easily.

Remember guys, these are just little tips and tricks that you can apply when you start building your kit gun or even improving your factory build!
The lock pictured will eventually get stripped down and the color case hardening removed so it can be browned for a much better overall look!
The color case bluing was removed using the product below. Just soak either a cotton ball or Q-tip and wipe it on the lock surface. Wait a few minutes to let it soak in and then apply another coat. After that I take the lock to the sink and with a green scotch brite pad, lightly buff the surface clean, rinse and dry.
All tiny screws and other small parts that need to be stripped of bluing can easily be done by placing into a small bowl and adding enough Blue & Rust Remover to cover the parts. WEAR GLOVES!
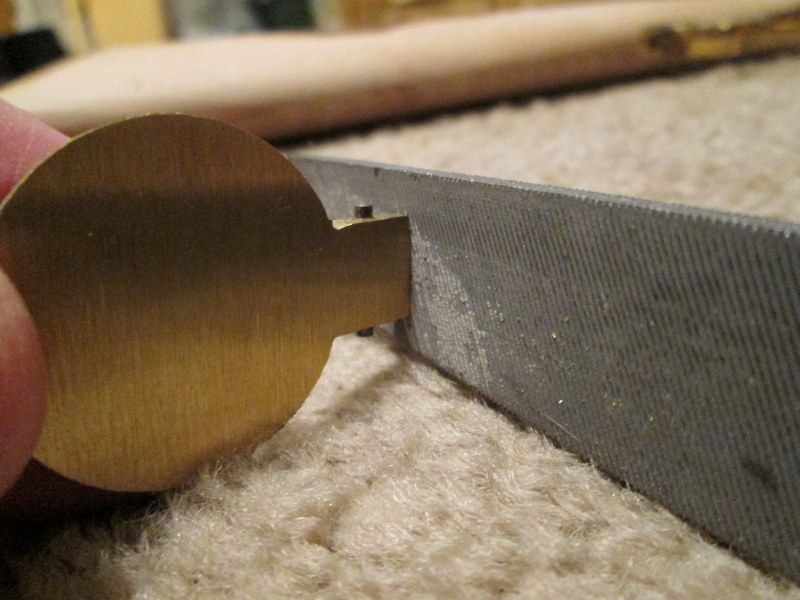
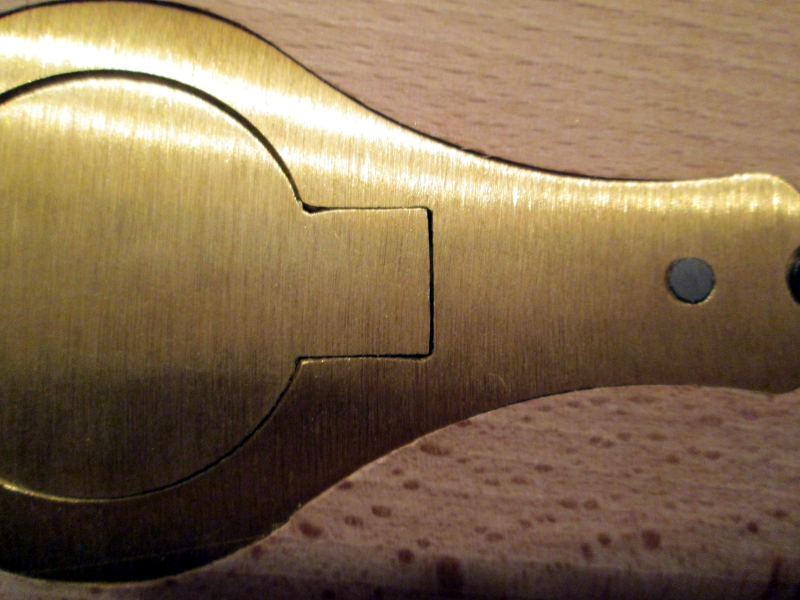
Working on the patch box we can see where the line is very tight and causes the lid to be difficult to open. Pretty straight forward fix by removing the patch box/lid and the spring and then using a fine tooth file to remove a little brass at a time and do your best to keep the lines straight! You don'twant to favor one side and have a lop sided gap.
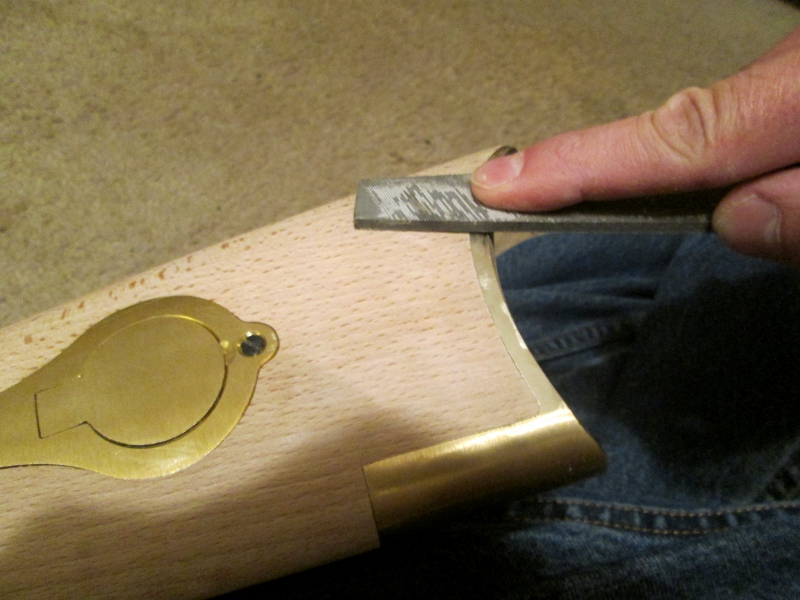
Now I am in the process of fitting the buttplate to the wood. I again used the same fine tooth file and gently let it "kiss" the wood, but not bite into the wood! Only the brass on my rifle has to be taken down a bit so the wood and brass mate up together nicely.
Now getting into the "fun" part of the kit, is removing all the extra wood. The nose cap has a great deal of wood that needs to be removed and shaped. This took me 2 hours, but I work slow because mistakes here can be made easily and slowing down and looking at the wood as you work, makes for a better wood to metal fit. A simple file with 100 grit sand paper was used and then later, the palm of my hand with the sand paper in it, to form the round forestock. Followed up with 150 grit and wet sanding.
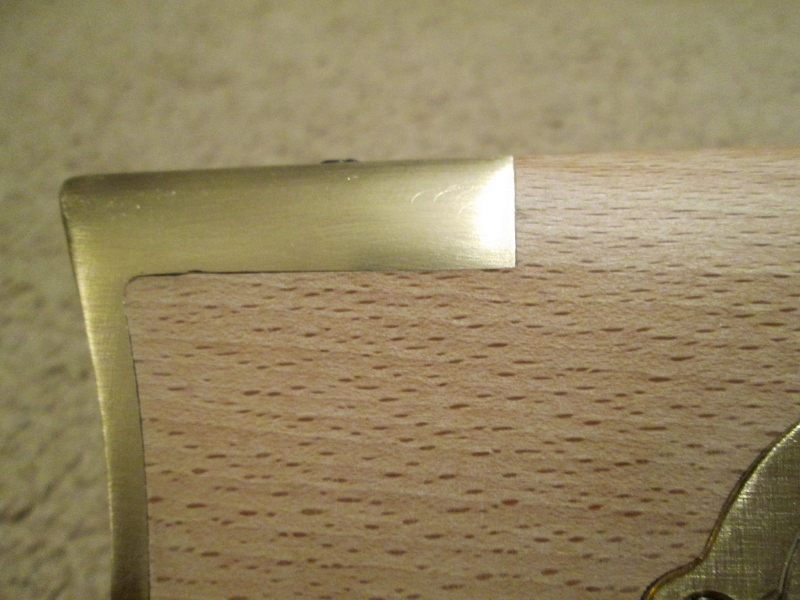
Moving onto the rear section of the stock, I removed any proud wood/metal from the patch box, stock and butt plate, again using 100 and 150 grit sand paper wrapped around a file and a thin piece of card board. Its VERY important to keep the lock panels clean and the edges sharp! It makes for a much better looking rifle than something that looks like someone sanded round and unevenly. I left a little extra proud wood around the lock in case I ever have to strip the stock for a refinish job years down the road.

Once all the wood work was finished, I used a damp wash cloth with water and wiped the stock down to raise the grain, let it dry and once dry, I used 150 grit sand paper on my rifle and card board sheet to knock the whiskers down. Wetting the stock raises the grain and allows any scratches to float up and be knocked down with a final sanding. This process may have to be repeated multiple times to achieve perfection. NOTE: Any time you wet a gun stock, be sure to install the lock and patch box afterward to prevent the wood from closing in and causing fit issues. Let the stock dry with the lock and patch box installed! It will save you lots of headaches in the long run.
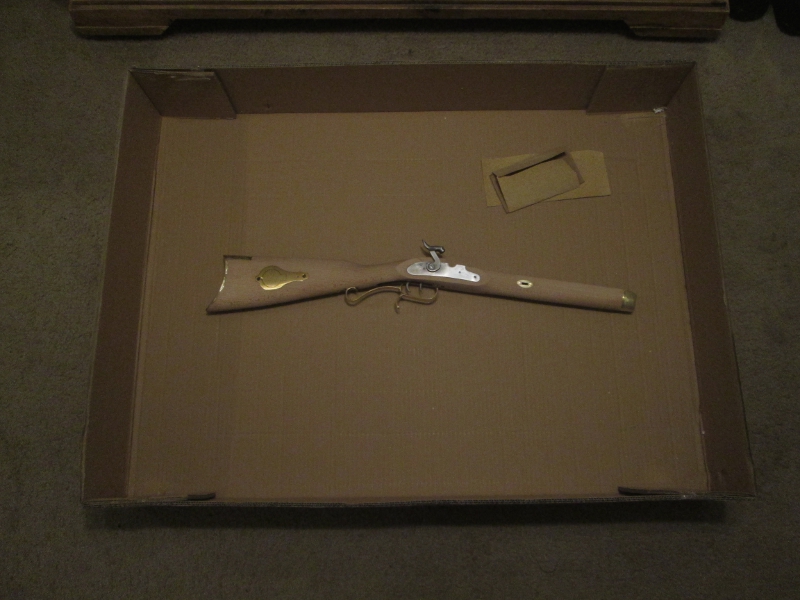
If you don't have a work place that's set up for wood working, you can use a low profile box like I did to keep all the wood dust/shavings from being scattered on the floor. Its also a good way to keep from losing parts while you are assembling the kit and fitting the metal.
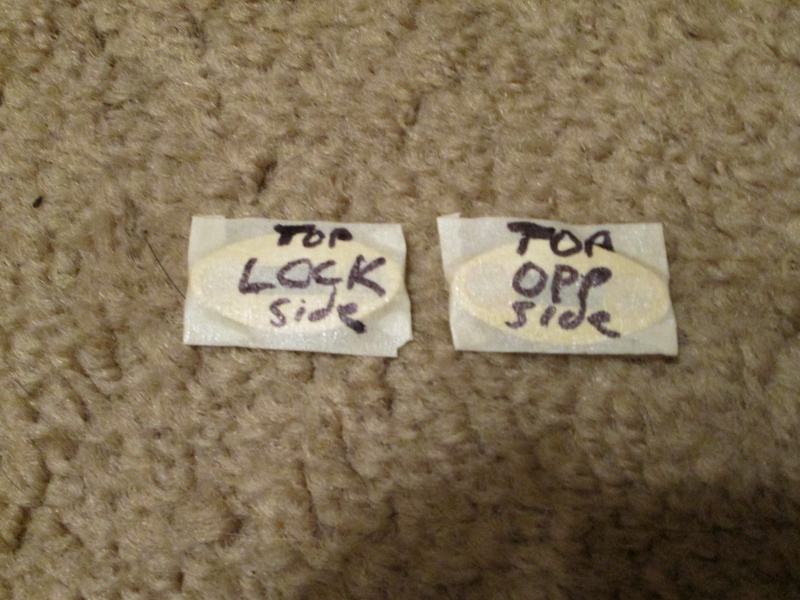
I do HIGHLY suggest that you mark your wedge key plates with the direction they go and what side they go on. Sometimes if you get them mixed up and install them on the wrong side or upside down, the wedge key will not properly fit through them as they may be filed on a certain side, more than the other. Lightly grease the screws before reinstalling as brass is soft and can easily break due to the snug fit.
Staining the stock! Now this is always the part I love! I got a Birchwood Casey refinishing fit, along with a bottle of their Rusty Walnut stain. I finally decided that I wanted a nice DARK stock this time around, along with a chocolate brown lock and barrel to just really bring out the romance of the wood and steel. The downside to a dark finish of course is that it can hide wood figure.
You'll see in the pictures below of the stain being applied in stages and how the color transforms.
Once I had the color where I thought it was just right, I used 0000 steel wool ( included with the refinishing kit) and lightly buffed the stock to smooth it out and remove heavy deposits of stain. Doing this helps removed just enough stain that it lets the wood grain underneath pop out and show itself a little bit.
In total, 6 coats of Walnut and 2 coats of Rusty Walnut were used to achieve the desired color that I wanted. The Rusty Walnut added that beautiful touch of red, but not over powering red when the sunlight hits the stock.
4 coats walnut,

After 2 coats of Rusty Walnut
After a total of 6 coats walnut - 2 coats of rusty walnut. Stock was allowed to dry over night before being lightly buffed with 0000 steel wool. The next series of pictures will follow!

Once I have ONE coat of Tru-oil on the stock, I allow it to dry for a full 24 hours. You may read online of some folks asking why their stock feels tacky. That's due to them applying to much finish at one time or multiple coats in a short period, not allowing for proper dry time between coats. Yes, 24 hours is a long time to wait, but guess what? It flat out works and allows the finish time to soak in and set up. When using boiled linseed oil, it can take up to 3 to 7 days for a single thin coat of oil to properly dry!
Once I had 4 coats applied, I used 0000 steel wool and gently buffed the gloss finish back to a dull finish. This helps cut the finish back and then fills the grain as you apply the next 2 coats and so on. Normally I will apply 3 coats of tru-oil, giving each coat time to set up before applying the next, and then buff it back. Doing this removes all the tiny little rough looking holes in the finish ( grain ) so you eventually build up enough finish for a smooth glass like overall finish.
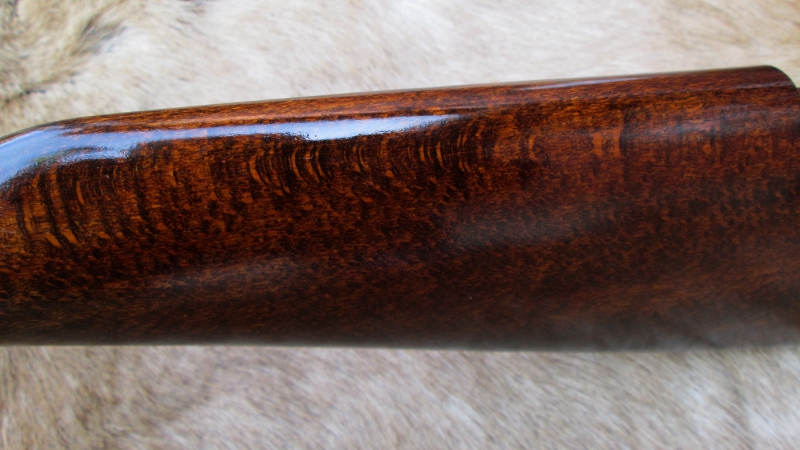
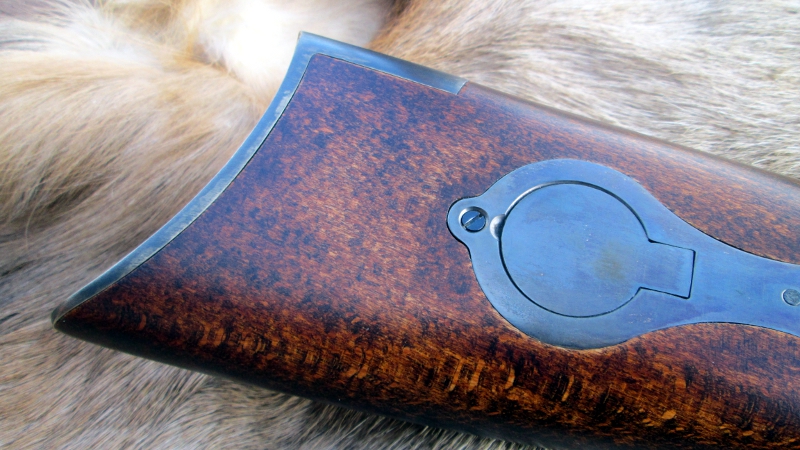
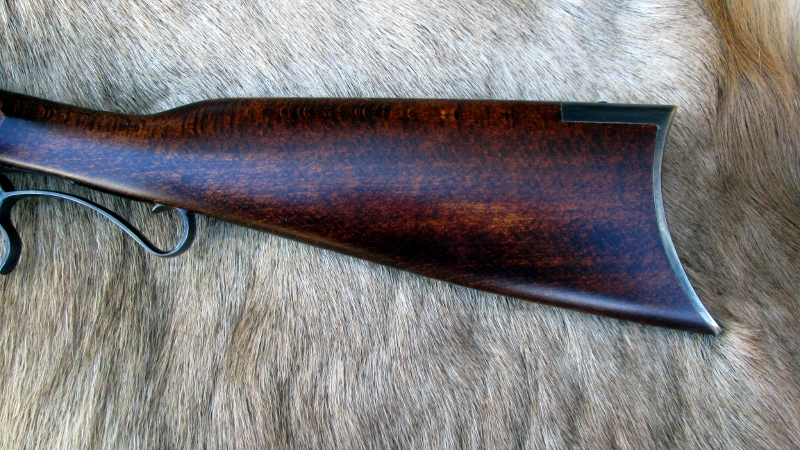
Take your time! The finish is the heart and soul of this project, it's the first thing people look at when they ask to see your rifle to admire it or in some cases, scrunch up their nose once they see a shoddy looking stock finish. One thing I love about beechwood is the gorgeous "Gold Nugget" figure its always has in the stock. This stuff just pops out like crazy with a dark finish, especially when the sunlight hits the stock.
Remember, those classic patina muzzleloaders we see from the 1700-1800s looked NEW at one time and over use, took on that patina due to hard use in the field. Let your muzzleloader take on that patina naturally over the next 10-20 years of use. Don't do a sloppy job and use the excuse of "Ahhhh! they all looked like this in the old day!" because they did not all look like that in the old'n day!
One other tip I can offer while applying the finish is that when it sets up, do yourself a favor and place the lock back into the stock, as well as the patch box! Any drips into the lock area or patch box can easily build up over time, causing fit issues. Replacing these parts will help cut any finish out rather than let it build up until you really have a problem!
It's also a great idea to install these parts while you buff the stock with steel wool. Keep the edges sharp and clean without digging through the finish, into the stan/wood, leaving light marks. All you need is the weight of your 2 or 3 fingers while you polish the finish with the steel wool.
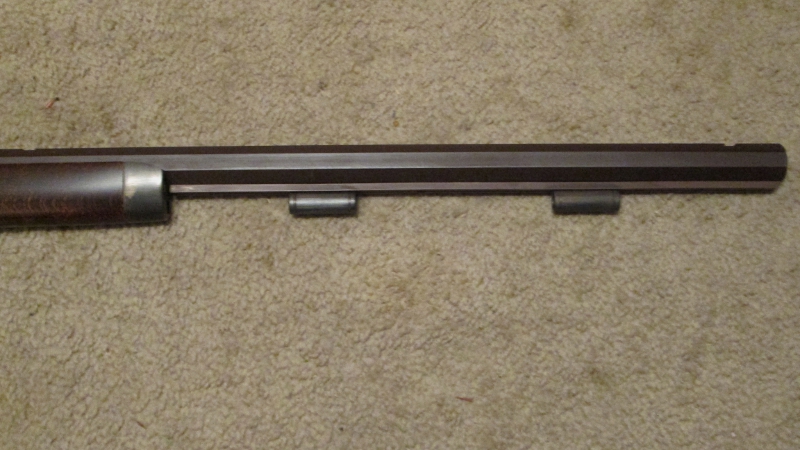
Now that I am at the barrel flat polishing stage, I use a nice wide flat file and wrap it with sand paper. The barrel on comes pretty much almost perfect out of the box, but during the build, you might get some nicks or scratches that will need to be buffed out a bit. On this barrel, I used 150 grit and just took my time to need to file flat on the barrel so I don't round the edges.
Now that we are on The Barrel, Lets also add in the Under Rib, Lock, Hammer and small Misc screws.
For the Barrel and other parts I am browning, I used Laurel Mountain Forge browning solution. This requires no heat gun, but DOES require humidity and a little heat.
De-grease your parts and dry them. Wetting a cotton ball or Q - Tip depending on the part, wipe the part down with ONE stroke! Rubbing the part down back and forth will cause the part to have a copper color and it will NOT brown! You need to wipe the part, or section of the part in ONE CLEAN MOTION.
Once the parts have been coated, now its time to turn the bathroom heater up and the shower. I like to run the shower until the mirror is lightly fogged. Keep in mind that if you get the bathroom to steamed up, Sweat will build up on your parts, causing water spots which will have you stripping your parts again and starting over.
Also, keep your parts higher up of the floor, otherwise the cool air at the bottom will prevent the parts from browning properly. At least 1 foot off the ground for consistent humidity!
Now that the parts are coated, up off the floor, shower turned on until the mirror has a slight fog, close the bathroom door and allow it to set for a couple hours before going back into the bathroom and turning on the shower once more. You'll do this multiple times.
After the first 6 hours, I'll re-wet a cotton ball and again with one single wipe, coat the barrel flats evenly, along with my other parts, re-humidify the bathroom, and let it do its thing. Normally it takes 3 to 5 coats to properly cover a barrel. After the 3rd, I will take it into the kitchen and use a rough texture cloth like denium and rub the barrel down with hot water to descale it for a smoother finish. Dry it, put it back in the bathroom and resume coats of LMF should it need it.
Once the barrel has rusted to the perfect color you like, Get a small bowl and mix up some Baking Soda water/Paste. BE CAREFUL! Baking soda is slightly abrasive and can cut through the browning while you wipe the barrel down!
Using baking soda deactivates the browning solution and stops the rusting process! After this, you can dry the barrel and coat it with your favorite gun oil.
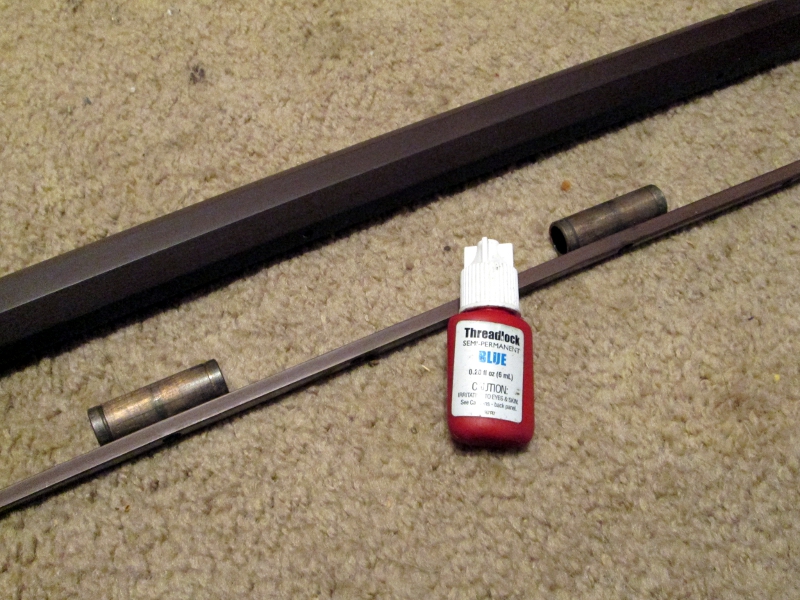
Be sure that you add a little Blue Loctite to the Under Rib screws and ESPECIALLY the ramrod thimble screws!
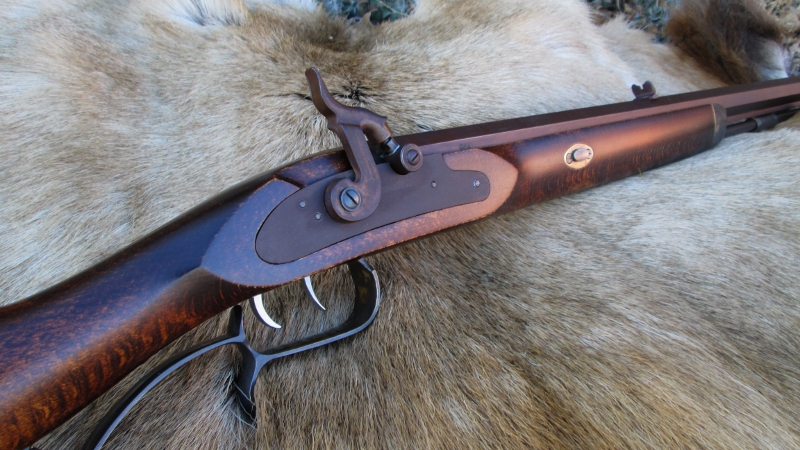
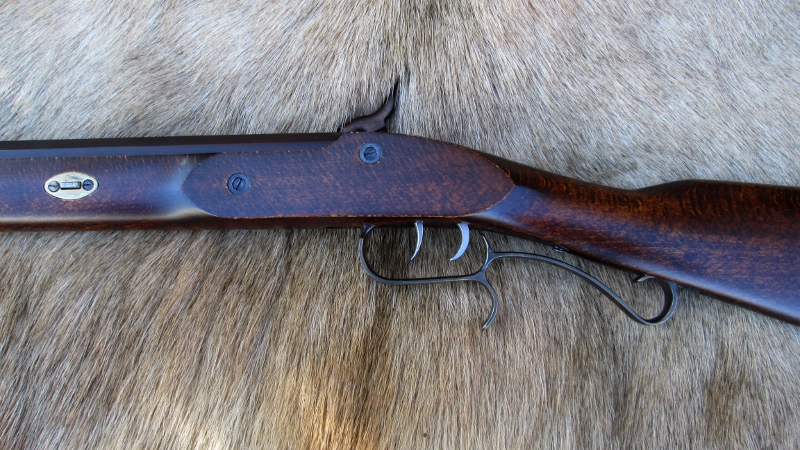
Overall, I am 100% pleased with the kit and quality of the parts. The lock came out wonderful after I polished it and to be quite honest, polishing the internals was not even needed. I did not polish the triggers either as the adjustment screws allowed me to take up any "drag" and left me with a super clean crisp trigger.
Aging the brass was the best thing I possibly could have done as I am not a big fan of brass. I do however love it when it has age to it.
Browning the barrel and lock was the real cherry on top! You can NOT beat the looks of a darn stocked Hawken and browned barrel & furniture.
One sad note however was when I cut the dovetal for the rear sight, I was not happy with the sight I have, so I ordered a new replacement which turned out to be smaller in the dovetail! Luckily my dad knows a local gunsmith and he cut that dovetail out, added a filler and then cut a new dovetail into that. Wonderful work and you can barely see the filler!
If you go to order a Lyman great plains rifle rear sight like I did, be sure to know that the one Track of the wolf sells are not true lyman products and are smaller! It all worked out in the end, but that minor irritation was enough to get under my skin.
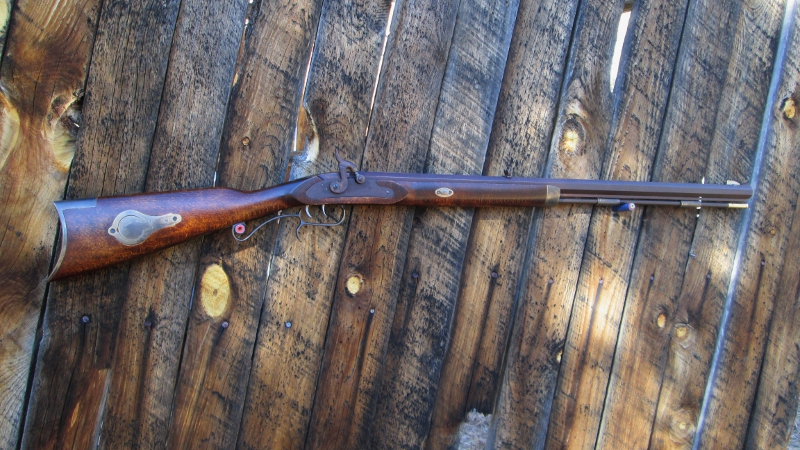
Now that that boring stuff is over, it's time to go out and shoot it!


Buckskins&BlackPowder- Admin

- Posts : 112
Join date : 2021-11-26
Age : 40
Location : Colorado -

Admin, George_Kelley, Maxjon, .50calcoyote, UFFDA and Rustycorvair like this post
![]()
![]()
Re: Traditions St.Louis Hawken Build
![]() by Admin 28/11/21, 04:37 pm
by Admin 28/11/21, 04:37 pm
EXCELLENT Work Jonathan!! Lot of time and effort in this, LOTS of AWESOME info here!!! 

Admin- Admin
- Posts : 677
Join date : 2021-09-19
Age : 40
Location : Eastern Colorado -
UFFDA likes this post
![]()
![]()
Re: Traditions St.Louis Hawken Build
![]() by Patch 29/11/21, 07:41 pm
by Patch 29/11/21, 07:41 pm
Very nice work…I love that color of the wood and your whole story. I love seeing youngbloods keeping the traditionals alive and running.
Patch- Posts : 7
Join date : 2021-11-29
UFFDA likes this post
![]()
![]()
![]()

 Similar topics
» my whatzit build
» Underhammer build
» A New Build For a Friend
» my new pistol build. a slow way to insanity!
» Medieval Handgonne Build
» Underhammer build
» A New Build For a Friend
» my new pistol build. a slow way to insanity!
» Medieval Handgonne Build
WELCOME to High Plains Muzzle Loading Forum! :: Muzzleloading, Firearms & Optics :: Custom Gunsmithing & Builds
Page 1 of 1
Permissions in this forum:
You cannot reply to topics in this forum|
|
|